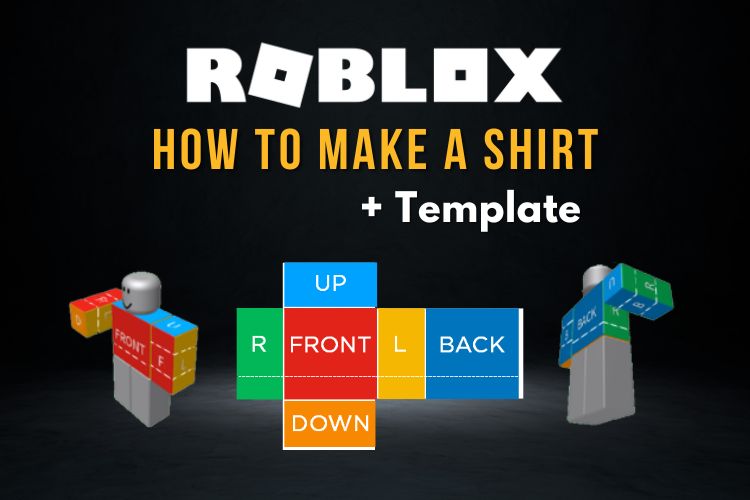
How to Make a Roblox Shirt: Step-by-Step Guide for Crafting Custom Gamewear
How to Make a Roblox Shirt: Step-by-Step Guide for Crafting Custom Gamewear
Painting your own Roblox shirt transforms generic avatar fashion into personal expression, blending creativity with technical know-how. Whether you're building custom apparel for gameplay, selling digital designs, or experimenting with virtual identity, crafting a Roblox shirt requires understanding the unique platform’s design ecosystem. This guide breaks down the entire process—from pixel-perfect asset creation to exporting play-ready garments—empowering both beginners and experienced creators to bring unique fashion to Roblox’s expansive universe.
Roblox’ shirt customization is built on a foundation of Lua scripting, Secure Segments, and optimized texture design. Unlike traditional graphic design tools, creators work within Roblox Studio, a powerful 3D creation environment specifically tailored for user-generated clothing. The process begins with defining your shirt’s digital blueprint, progressing through material implementation, texture painting, and final export—each stage demanding precision to ensure compatibility across devices and platforms.
According to Roblox developer resources, “accurate coordinate mapping and proper file formats are critical to prevent visual glitches and ensure seamless in-game rendering.”
Step 1: Design Your Digital Shirt Blueprint
Before applying any color or texture, developing a clear digital blueprint ensures your shirt fits robotic seamlessly in Roblox’s 3D space. Most creators start with drawing a 2D schematic using design software such as Adobe Photoshop, GIMP, or even Roblox Studio’s native blueprint visualizer, though external tools allow for finer control. Focus on exact dimensions: standard Roblox shirts typically stand between 30–40 studs tall, with a shoulder width matching avatar proportions for a natural fit.Essential elements of the blueprint include: - **Torso length and seam placement** – Exactly 18–22 studs for full chest coverage - **Side seam alignment** – Matched keyframes for shirt front and back for smooth rendering - **Cuff height and style** – Standard curl cuffs range from 2 to 6 studs - **Pocket placement** – Front and back pockets must align with character mesh points These measurements prevent cropping issues during gameplay, especially on small mobile screens where pixel accuracy directly affects user experience. Digital-first design also allows experimentation with silhouettes—oversized graphics, layered panels, or 3D-shaped collars—that stand out in Roblox’s fast-paced environment.
Step 2: Create or Source Compatible Assets
Once the digital blueprint is locked, the next phase involves assembling textures and materials that align with Roblox’s engine requirements.The platform supports glTF file formats optimized for real-time rendering, ensuring fast load times and consistent appearance across devices. Creators typically use three asset types: textures, colors, and pattern layers. For texture creation, tools like Photoshopped PNG layers or digital painting software (e.g., Krita or Corel Painter) enable hand-painted realism or stylized vector art.
Alternatively, royalty-free platform libraries (such as Polygonal or Texture Haven) offer high-resolution shirts compatible with Roblox’s specs. When sourcing existing designs, ensure textures meet resolution standards—minimum 1024x1024 pixels for full-body coverage, though higher resolution enhances detail clarity at close range. Color customization follows RGB or HEX coding, with Roblox enforcing strict color palettes to maintain visual consistency.
Advanced users manipulate Lua scripts in Roblox Studio to dynamically apply color variations, enabling customizable shirts via avatar preferences or player choices—ideal for game designers integrating storefronts with unique designs. Key Tip: Use the “Digital Fabric” feature in Roblox Studio to generate halftone patterns instantly, replicating realistic textile effects like weave or pinstripes without complex painting.
Step 3: Apply Textures and Materials in Roblox Studio
Importing assets into Roblox Studio marks a pivotal transition from design to functional garment.Using the Studio’s “Secure Segment” system, creators map textures to shirt geometry with pixel-perfect precision. This process ensures no stretch, distortion, or misalignment occurs when players wear the shirt across avatars. Each part—chest, sleeves, cuffs—must be assigned the correct material shader.
Roblox Studio defaults to durable and smooth materials, optimized for in-game durability and visual fidelity. For premium looks, custom Lua scripts can give shirts dynamic properties, such as animated graphics that shift on movement or interactive tag efficiencies that trigger unique effects during gameplay. Step-by-step workflow in Studio includes: 1.
Import texture files via the “Textures” section 2. Apply to designated body parts using the “Apply Material” button 3. Adjust UV mapping for seamless tiling 4.
Use “Paint All” with a lower brush opacity to blend edges softly Advanced creators often employ texture projections—projecting pattern layers onto 3D mesh curves—to simulate realistic fabric folds and shadows. This adds depth without heavy polygon counts, preserving frame rates during live gameplay.
Step 4: Test, Optimize, and Export Your Shirt
Before publishing, rigorous testing ensures the shirt performs flawlessly.Use Roblox Studio’s preview mode to view garments on multiple avatars across device types. Check for issues like clipping (textures visible through fabric), color inaccuracies, or misaligned seams. Testing should include fast rotation, high-speed movement, and varying lighting conditions to simulate real-gameplay.
Optimization targets include reducing texture file sizes under 100 KB for faster load times, minimizing draw calls by streamlining shader complexity, and ensuring compatibility with older games or devices with less powerful hardware. The export process involves: - Saving as a secure segment `.rbxl` file - Validating via Roblox Atelier to check for script errors - Ensuring metadata tags like “Gameplay Wearable,” “Customizable,” and “Advanced Graphics” are properly embedded “Optimization is often the unsung hero of successful Roblox fashion,” notes senior developer Mark Tran. “A visually stunning shirt that lags or glitches ruins immersion—optimized assets keep players engaged.” Creators often release shirts through Robloxavers or direct storefronts, using Trides or Patterns to allow future customization.
Community feedback loops help refine designs, turning one-off projects into celebrated wardrobe staples within Roblox’s vibrant culture.
With precise planning, skilled implementation, and thoughtful testing, crafting a Roblox shirt evolves from concept to wearable digital art—bridging imagination and technology in one click.
The process of making a Roblox shirt combines technical precision with artistic vision, requiring mastery of digital design, material properties, and platform-specific tools. From blueprint planning through export optimization, each step contributes to a garment that not only enhances avatar identity but also performs reliably in Roblox’s diverse gaming ecosystem.As creators refine their techniques, they unlock new potential to shape virtual fashion, turning pixels into personalized style that resonates across millions of players worldwide.


Related Post

Unveiling OSCLAPORSC: A Deep Dive Into Its Core Architecture and Transformative Potential
GTA Vice City On Mac: A Thrilling Guide

Winden Business Debit: The Engine Driving Modern Corporate Spending Efficiency
Unveiling The Age Of Justin Bieber's Sister: How Old Is She?